
One part of pentesting can involve Social Engineering attacks to get access to systems. That means you sometimes need to know how to run an effective phishing campaign — whether through email or even by phone (vishing).
Over the last two weeks, I’ve been diving into phishing via email, with my main target being… myself. The goal was simple: use OSINT to gather the info needed to craft a convincing email and trick me into clicking a malicious link. In this post, I’ll walk through that OSINT process, the tools I used, and how I set them up.
This blog post is for educational purposes only. Do not attempt this on systems or people without permission. In many countries, sending phishing emails without authorization is illegal.
What Bad Phishing Emails Look Like
Before we write a good phishing email, it’s important to understand what makes a bad one. Chances are, you’ve already received a few in your inbox. Here’s one I got recently:
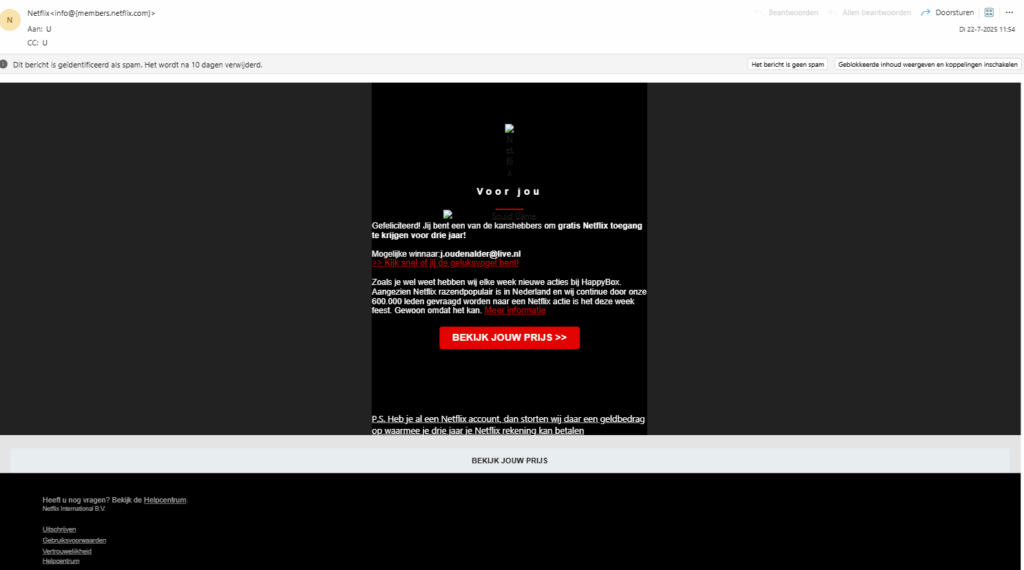
This one’s in Dutch (my native language), but phishing mistakes are universal. Let’s break down what’s wrong here:
- Generic greeting – They just start with “Gefiliciteerd!” If they really knew me, why not use my name? This screams “mass mailing list.”
- Grammatical errors – Dutch is a tricky language, but still… at least run it through a spell checker.
- Suspicious sender address – Always a red flag. At least try to make it look like the domain or company you’re spoofing.
- Mismatched URLs – They have multiple links that all point to completely unrelated sites. That’s instant suspicion.
Sometimes I wonder if these attackers are even trying — but if even 1 out of 10 million people click, it’s still a “win” for them.
Basic OSINT for Phishing
Now that we know what not to do, let’s gather the info we need to craft a better phishing email. OSINT (Open Source Intelligence) is key here — the more you know about your target, the more believable your email will be. In my case, I’m “attacking” my own blog, so I’m looking for:
- Name of the target
- Email address
- Type of blog software and plugins used
Some quick tools and commands for that:
wig [url]                # Detects which CMS/software the site is running
wpscan [url] -e u         # Enumerates WordPress users
dig soa [url]             # Looks up domain registration contact info
Also, don’t forget: sometimes the site’s own contact page is the easiest place to find an email address.
Important: Stick to passive OSINT. You don’t want to make noise that alerts your target or tips off security systems.
Once we’ve collected the basics, we can start crafting the phishing email. But we can’t just send it from our real email address — we need it to look like it’s coming from someone “inside” the organization. That’s where some extra tooling comes in…
Tooling
There’s a lot of tooling out there for phishing campaigns, but for this project I experimented with two: GoPhish and Evilginx. Before we can use them effectively, we need some infrastructure — namely a domain, a VPS, and ideally a Google Workspace (G Suite) account tied to that domain. That last one helps bypass some spam filters since the emails come from a domain that’s considered more “trusted.”
Domain
SIn the bad phishing example earlier, the sender’s domain looked nothing like the company it was impersonating. That’s an immediate red flag. So, let’s make it a bit more convincing using a few tricks:
- Don’t buy a blacklisted domain
This will tank your email deliverability before you even begin. Always check using tools like mxtoolbox.com.
(Side note: the domain I bought for testing somehow landed on two blacklists already. Oops. Funny, but not ideal.) - Typosquatting (Domain Permutations)
Register a domain with small spelling or character changes (e.g.,hackingwithi.com). People often don’t notice because our brains autocorrect when reading quickly. - Subdomain Spoofing via Hyphenation
Instead of using something likelogin.example.com(which you can’t buy), registerlogin-example.com. The dash makes it look like a subdomain at first glance. - Alternative Top-Level Domains (TLDs)
If the target uses.com, grab.cam,.co,.biz, etc. At a glance, many won’t notice the difference.
For my test, I went with hackingwithj.cam — and honestly, in a split second it’s hard to spot the difference. Plus, it only cost me around €5, which was totally worth it.
Virtual Private Server (VPS)
Hosting everything on your own machine isn’t the smartest move. A VPS keeps things isolated and lets you operate from the cloud. Any basic provider will work, as long as you have a public IP and stay within their terms of service. For example, DigitalOcean gives you free starting credit, which is perfect for spinning up a small droplet with basic specs. That’s more than enough for a test project like this.
Programs
For this experiment, I picked two open-source tools designed specifically for phishing: GoPhish and Evilginx. Both are actively developed and feel polished, which is a big plus when you’re learning. You might wonder why I didn’t go with the Social Engineering Toolkit (SET) — mostly because it’s more of an all-rounder, with a lot of modules I didn’t need for this project. SET is great, but for email-based phishing specifically, I found GoPhish and Evilginx to be more focused. That said, I’ll probably circle back to SET in the future for a deeper dive.
Setting everything up
Both tools work a little differently, so the setup process is also a bit different for each. But before we even touch GoPhish or Evilginx, we need to make sure our emails actually land in the inbox instead of vanishing into spam.
Our domain is fairly new, and that means spam filters are not exactly our best friends yet. To boost our success rate, we can route our emails through a more “trusted” sender — in this case, Google. This doesn’t just make delivery easier, it also makes the whole thing look a lot more legitimate from the recipient’s point of view. The process is straightforward:
- Go to the Google Workspace signup page.
- Create a trial account with your test domain (you can cancel it later to avoid charges).
- Choose a believable sender name like
IT-support@domain.comoradmin@domain.com. - Add the required DNS records to verify the domain.
Once your domain is verified, it’s time to install GoPhish and Evilginx. I created an installation script for both — this way, you don’t have to manually edit configuration files, and it also automates the process of setting up a phishing campaign.
GoPhish
GoPhish comes with a nice web interface that makes building phishing campaigns surprisingly easy. For my test, I wanted to phish myself (yes, really) and see how convincing I could make it.
Since I know my own blog runs on WordPress, a fake WordPress login page seemed perfect. In GoPhish, creating this is simple — in the Landing Pages section, I clicked New Page, hit Import Site, and pointed it to the real login page.
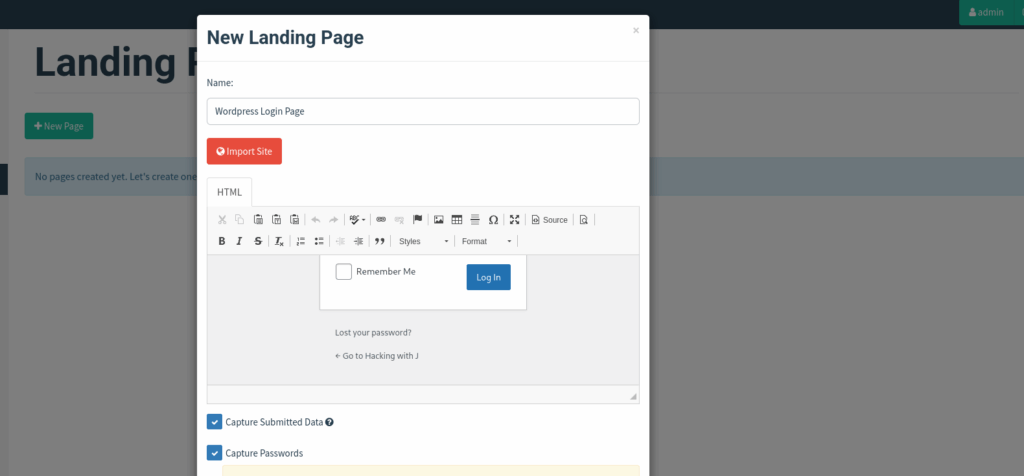
Now, I did run into one small problem: the login didn’t actually work at first. Turns out, GoPhish doesn’t like certain <script> tags in the page. Deleting them manually fixed it.
Next, I needed to set up a sending profile for hackingwithj.cam so GoPhish could actually send my emails. I used my GSuite account for this, but had to configure an SMTP relay because Gmail was blocking the traffic. The quick fix was to tunnel it like this:
ssh -N -R 2525:smtp-relay.gmail.com:587 root@Then we can setup the sending profile as follows:
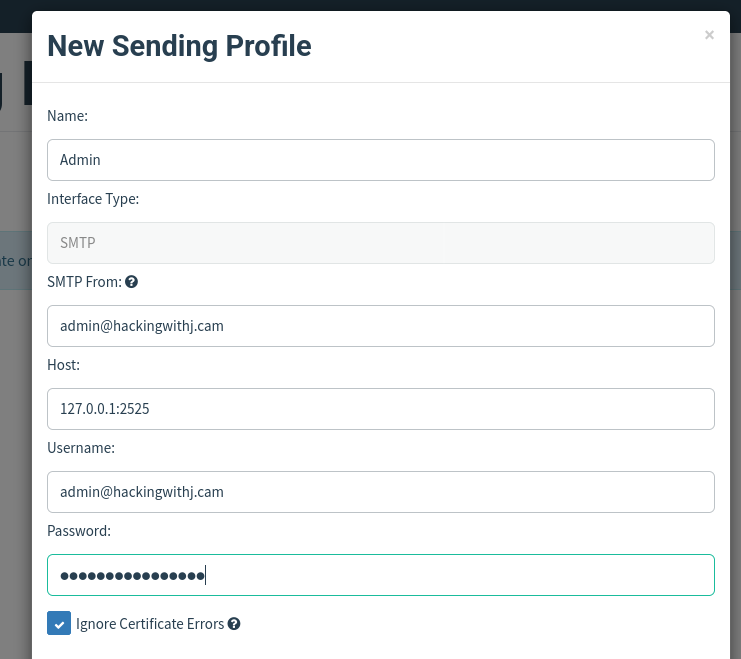
Then the only 2 things left to do: users & email setup, for the first one you just have to do your OSINT good and for the second one we can use ChatGPT to With that in place, I just created the sending profile in GoPhish, added my test “victims” (also me), and crafted the email. For the email body, ChatGPT is surprisingly handy — I asked it to write something like:
“There’s an issue with your WordPress plugin X. Please log in to fix it.”
From there, I tweaked it to make it sound natural and added some HTML styling so it matched my site. In my test, I ran a small campaign and added a screenshot here showing how the campaign captures info from the mailing list.
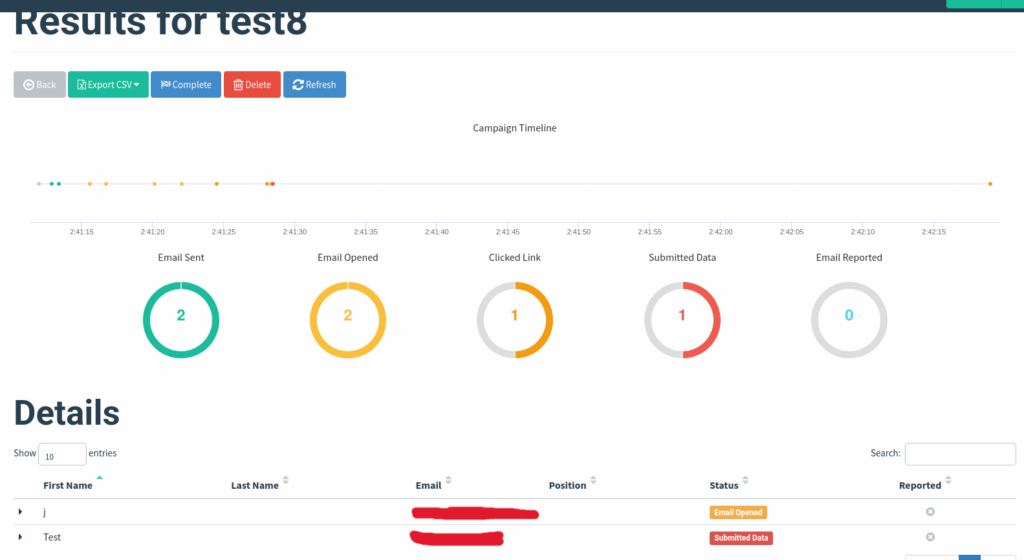
What I like the most is the tracking feature — this can also help you confirm certain email addresses from the target, because you know they opened the email.
While GoPhish gives you a polished interface and solid email tracking, it mainly focuses on capturing static credentials through fake login pages. But what if your target uses MFA or more advanced login protections?
That’s where Evilginx shines. Instead of just showing a fake page, it acts as a live proxy between the victim and the real site — capturing not only usernames and passwords but also multi-factor tokens in real time. Let’s see how it works.
Evilginx
Evilginx works a bit differently from GoPhish. It doesn’t bother with a fancy landing page editor — instead, its strength is acting as a man-in-the-middle proxy. And yes, it even rickrolls anyone who doesn’t hit the exact URL. Running it is stupidly easy with my install script. Just execute it and it will spin up Evilginx with a default phishlet for a WordPress login page. You can swap it out for another phishlet easily, but if you just run it as-is, you’ll have a working phishing URL in about a minute.
Once you’ve got the link, you can send it to your target (GSuite mail works well for avoiding spam) and start catching logins. Unlike a static fake page, Evilginx sits in between the victim and the real site — meaning you don’t just grab their username and password, you can also capture MFA tokens and replay them.

This makes it very effective, because even if your victim is using a hardware key or an authenticator app, Evilginx can still hijack the live session. For my test, I pointed it at a demo WordPress site. The moment the victim logs in, Evilginx quietly stores their credentials and session cookies — no extra alerts, no obvious warnings in the browser.
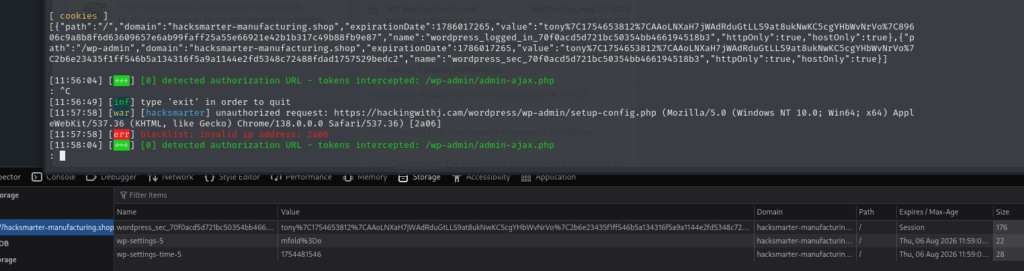
It’s so easy and lightweight to run that it feels almost unfair.
Final notes
Both tools are great in their own ways, and I really enjoyed the process of setting everything up and, yes, even phishing myself. It’s a humbling experience — seeing firsthand how convincing a carefully crafted email and landing page can be, even when you know it’s coming.
The best email I wrote was this one:
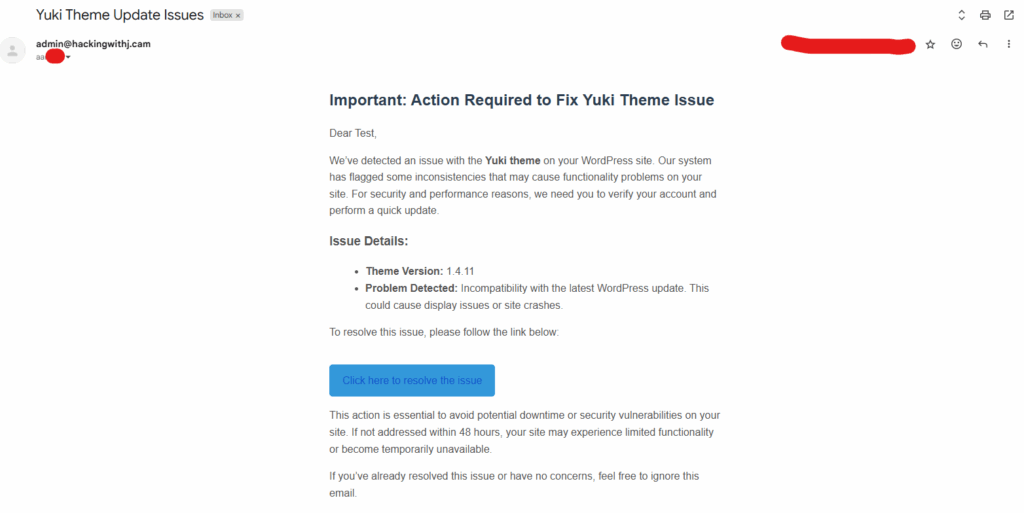
Honestly, I think I didn’t do too bad of a job. If you’re not super tech-savvy or don’t spend much time thinking about IT security and website details, it’s easy to imagine falling for something like this. That’s what makes phishing such a powerful and dangerous technique. So please, don’t try to phish me — let’s keep things ethical and safe!
These experiments remind me how critical it is to stay vigilant about emails asking for credentials or urgent actions. Even if something looks familiar, a second look and some skepticism can go a long way.
Lessons learned
- Preparation is key: Setting up your domain and routing mail through a trusted sender like Google Workspace dramatically improves your email deliverability. Without it, your carefully crafted emails might never reach the inbox.
- Attention to detail matters: When cloning real sites for phishing pages, small things like scripts or security features can break your setup. Taking the time to troubleshoot and tweak the pages is essential for a believable campaign.
- Tracking is powerful: Features like GoPhish’s email open tracking help verify that your target engaged with the email. This can be a valuable tool during penetration tests or awareness campaigns to measure impact.
- MFA isn’t a silver bullet: Evilginx shows that multi-factor authentication can still be bypassed with clever man-in-the-middle attacks. It’s a reminder that security is about layers, not just a single control.
- Ethics first: Running phishing campaigns — even on yourself — is a great learning tool. But it’s critical to stay ethical and only test where you have explicit permission. The goal is to improve security, not exploit it.
Overall, this hands-on approach helped me understand the nuances of phishing beyond just theory. Hopefully, sharing these insights will help you get a feel for the process too — and maybe inspire you to explore this side of security responsibly.